> **什么是 Langfuse?** Langfuse 是一个开源的 LLM 工程平台,帮助团队跟踪 API 调用、监控性能并调试其 AI 应用程序中的问题。
追踪 LangChain
Langfuse 追踪 使用 LangChain 回调集成 LangChain (Python, JS)。因此,Langfuse SDK 会为您的 LangChain 应用程序的每次运行自动创建一个嵌套追踪。这允许您记录、分析和调试您的 LangChain 应用程序。
您可以通过 (1) 构造函数参数或 (2) 环境变量配置集成。通过注册获取您的 Langfuse 凭证 cloud.langfuse.com or 自托管 Langfuse.
构造函数参数
pip install langfusefrom langfuse import Langfuse, get_client
from langfuse.langchain import CallbackHandler
from langchain_openai import ChatOpenAI # Example LLM
from langchain_core.prompts import ChatPromptTemplate
# Initialize Langfuse client with constructor arguments
Langfuse(
public_key="your-public-key",
secret_key="your-secret-key",
host="https://cloud.langfuse.com" # Optional: defaults to https://cloud.langfuse.com
)
# Get the configured client instance
langfuse = get_client()
# Initialize the Langfuse handler
langfuse_handler = CallbackHandler()
# Create your LangChain components
llm = ChatOpenAI(model_name="gpt-5.5")
prompt = ChatPromptTemplate.from_template("Tell me a joke about {topic}")
chain = prompt | llm
# Run your chain with Langfuse tracing
response = chain.invoke({"topic": "cats"}, config={"callbacks": [langfuse_handler]})
print(response.content)
# Flush events to Langfuse in short-lived applications
langfuse.flush()环境变量
LANGFUSE_SECRET_KEY="sk-lf-..."
LANGFUSE_PUBLIC_KEY="pk-lf-..."
# 🇪🇺 EU region
LANGFUSE_HOST="https://cloud.langfuse.com"
# 🇺🇸 US region
# LANGFUSE_HOST="https://us.cloud.langfuse.com"
# Initialize Langfuse handler
from langfuse.langchain import CallbackHandler
langfuse_handler = CallbackHandler()
# Your LangChain code
# Add Langfuse handler as callback (classic and LCEL)
chain.invoke({"input": "<user_input>"}, config={"callbacks": [langfuse_handler]})要了解如何将此集成与其他 Langfuse 功能结合使用,请查看 这个端到端示例.
追踪 LangGraph
本部分演示如何 Langfuse 使用 LangChain 集成.
初始化 langfuse
Note: 您需要至少运行 Python 3.11 (GitHub Issue).
使用您的 API 密钥 初始化 Langfuse 客户端,这些密钥可以从 Langfuse UI 中的项目设置获取,并添加到您的环境中。
pip install langfuse
pip install langchain langgraph langchain_openai
# get keys for your project from https://cloud.langfuse.com
os.environ["LANGFUSE_PUBLIC_KEY"] = "pk-lf-***"
os.environ["LANGFUSE_SECRET_KEY"] = "sk-lf-***"
os.environ["LANGFUSE_HOST"] = "https://cloud.langfuse.com" # for EU data region
# os.environ["LANGFUSE_HOST"] = "https://us.cloud.langfuse.com" # for US data region
# your openai key
os.environ["OPENAI_API_KEY"] = "***"使用 LangGraph 的简单聊天应用
我们将在本节中做什么:
- * 在 LangGraph 中构建一个可以回答常见问题的支持聊天机器人
- * 使用 Langfuse 追踪聊天机器人的输入和输出
我们将从基本的聊天机器人开始,在下一节中构建更高级的多代理设置,并沿途介绍关键的 LangGraph 概念。
创建代理
首先创建一个 StateGraph. A StateGraph 对象将我们的聊天机器人定义为状态机。我们将添加节点来表示聊天机器人可以调用的 LLM 和函数,以及边来指定机器人在这些函数之间如何转换。
from typing import Annotated

from langchain_openai import ChatOpenAI
from langchain.messages import HumanMessage
from typing_extensions import TypedDict

from langgraph.graph import StateGraph
from langgraph.graph.message import add_messages

class State(TypedDict):
    # Messages have the type "list". The `add_messages` function in the annotation defines how this state key should be updated
    # (in this case, it appends messages to the list, rather than overwriting them)
    messages: Annotated[list, add_messages]

graph_builder = StateGraph(State)

llm = ChatOpenAI(model = "gpt-5.5", temperature = 0.2)

# The chatbot node function takes the current State as input and returns an updated messages list. This is the basic pattern for all LangGraph node functions.
def chatbot(state: State):
    return {"messages": [llm.invoke(state["messages"])]}

# Add a "chatbot" node. Nodes represent units of work. They are typically regular python functions.
graph_builder.add_node("chatbot", chatbot)

# Add an entry point. This tells our graph where to start its work each time we run it.
graph_builder.set_entry_point("chatbot")

# Set a finish point. This instructs the graph "any time this node is run, you can exit."
graph_builder.set_finish_point("chatbot")

# To be able to run our graph, call "compile()" on the graph builder. This creates a "CompiledGraph" we can use invoke on our state.
graph = graph_builder.compile()
将 langfuse 作为回调添加到调用中
现在,我们将添加 用于 LangChain 的 Langfuse 回调处理器 来追踪我们应用程序的步骤: config={"callbacks": [langfuse_handler]}
from langfuse.langchain import CallbackHandler

# Initialize Langfuse CallbackHandler for LangChain (tracing)
langfuse_handler = CallbackHandler()

stream = graph.stream_events(
    {"messages": [HumanMessage(content="What is Langfuse?")]},
    config={"callbacks": [langfuse_handler]},
    version="v3",
)
for snapshot in stream.values:
    print(snapshot)
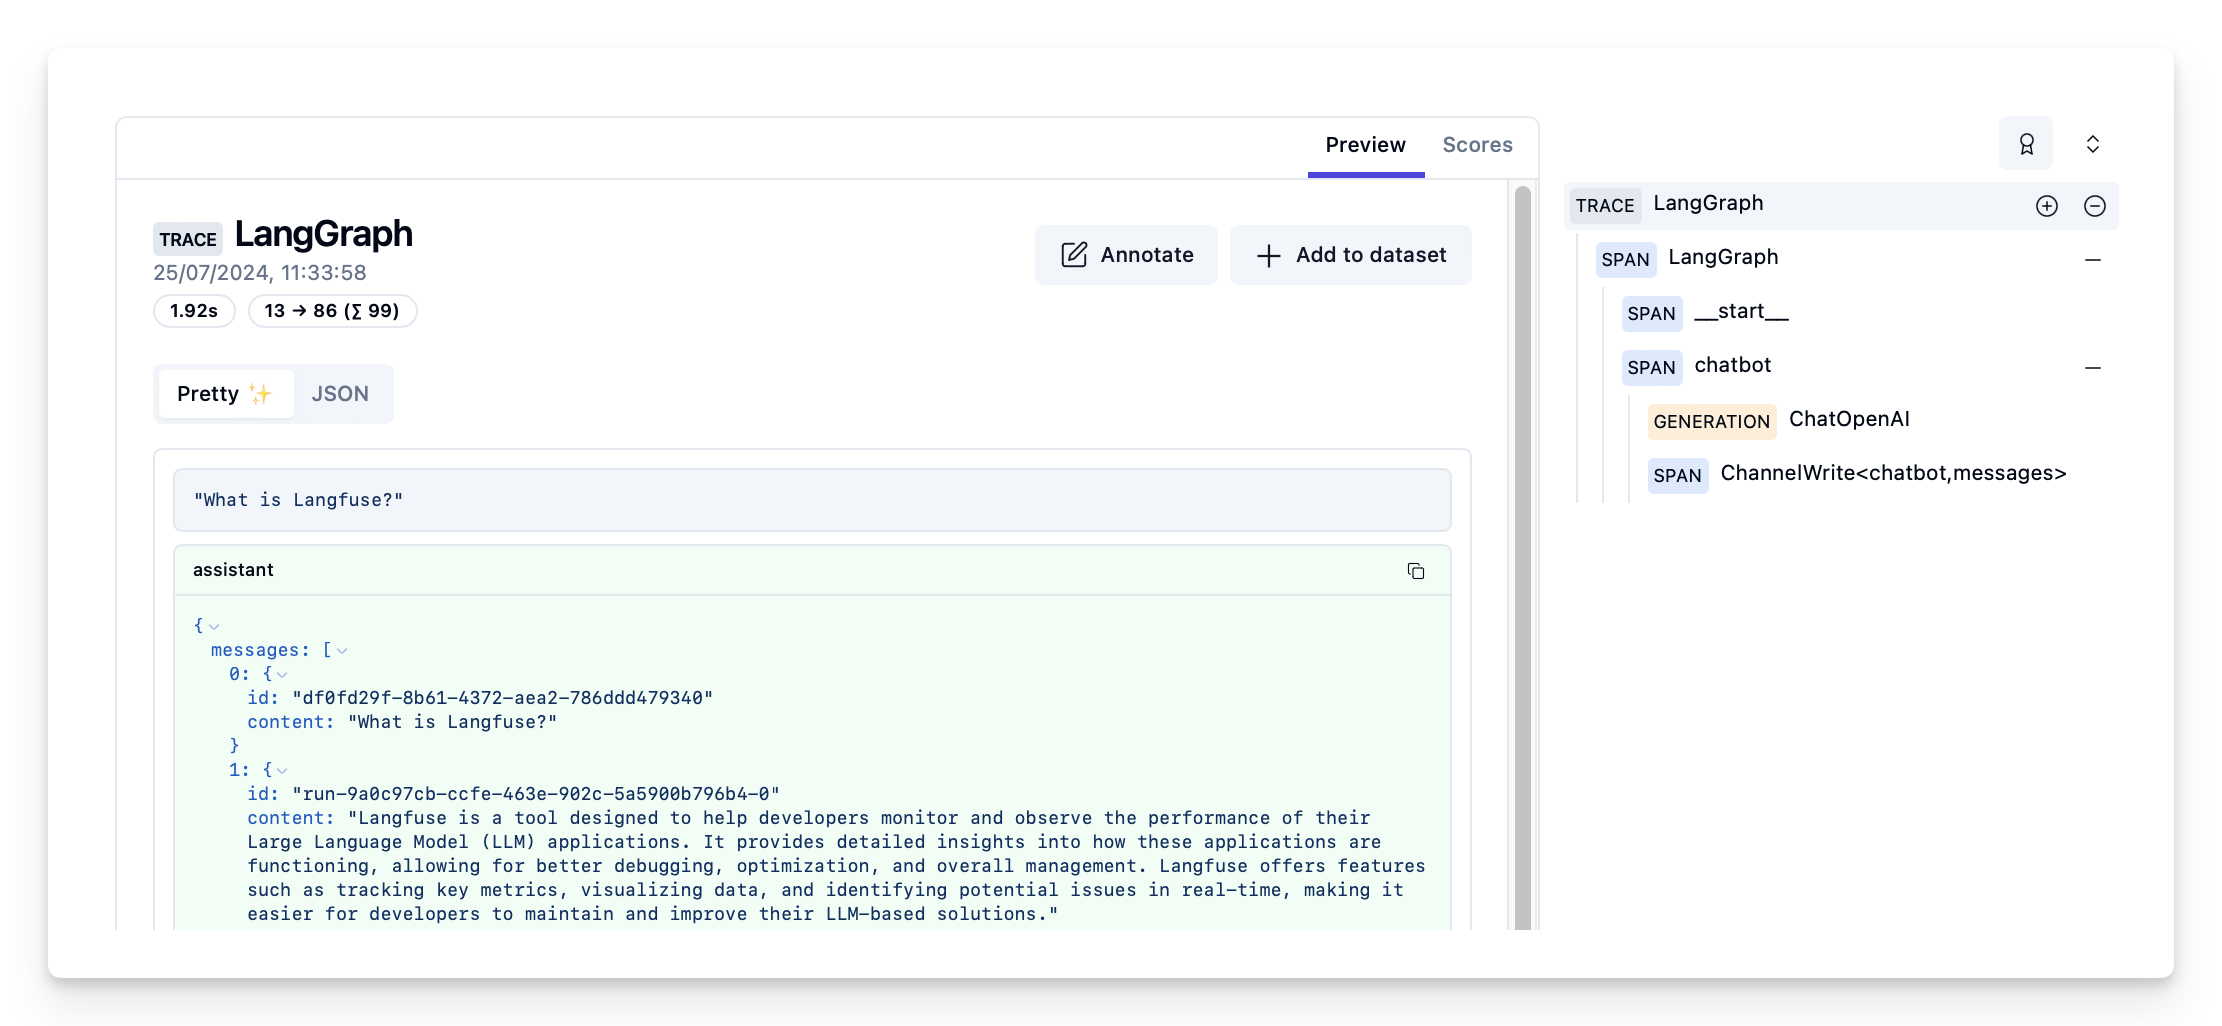
{'chatbot': {'messages': [AIMessage(content='Langfuse is a tool designed to help developers monitor and observe the performance of their Large Language Model (LLM) applications. It provides detailed insights into how these applications are functioning, allowing for better debugging, optimization, and overall management. Langfuse offers features such as tracking key metrics, visualizing data, and identifying potential issues in real-time, making it easier for developers to maintain and improve their LLM-based solutions.', response_metadata={'token_usage': {'completion_tokens': 86, 'prompt_tokens': 13, 'total_tokens': 99}, 'model_name': 'gpt-4o-2024-05-13', 'system_fingerprint': 'fp_400f27fa1f', 'finish_reason': 'stop', 'logprobs': None}, id='run-9a0c97cb-ccfe-463e-902c-5a5900b796b4-0', usage_metadata={'input_tokens': 13, 'output_tokens': 86, 'total_tokens': 99})]}}在 langfuse 中查看追踪
Example trace in Langfuse: https://cloud.langfuse.com/project/cloramnkj0002jz088vzn1ja4/traces/d109e148-d188-4d6e-823f-aac0864afbab
- - 查看 完整笔记本 以查看更多示例。
- - 要了解如何评估您的 LangGraph 应用程序的性能,请查看 LangGraph 评估指南.