安装与更新
如何在不同系统上手动安装 ComfyUI
本部分将指导你完成在 Windows、MacOS 以及 Linux 的手动安装过程
对于 ComfyUI 的安装, 主要分为几个步骤
- 创建一个虚拟环境(避免污染系统级 Python 环境)
- 克隆 ComfyUI 代码仓库
- 安装依赖
- 启动 ComfyUI
你也可以参考 ComfyUI CLI 来安装 ComfyUI, 它是一个命令行工具,可以方便地安装 ComfyUI 并管理其依赖。
(可选)创建虚拟环境
Install Miniconda. 这将帮助您安装 ComfyUI 所需的正确版本的 Python 和其他库。
使用 Conda 创建一个环境。
conda create -n comfyenv
conda activate comfyenv
克隆代码仓库
你需要保证你的系统上已经安装了 Git, 首先你需要打开终端(命令行),然后克隆代码仓库。
Windows
Linux
打开终端应用程序。
MacOS
打开终端应用程序。
git clone https://github.com/Comfy-Org/ComfyUI.git安装GPU 及 ComfyUI 依赖
安装 GPU 依赖
安装 GPU 依赖
Nvidia
pip install torch torchvision torchaudio --extra-index-url https://download.pytorch.org/whl/cu130或者,您可以安装 PyTorch 的 nightly 版本。
安装 Nightly 版本
pip install --pre torch torchvision torchaudio --index-url https://download.pytorch.org/whl/nightly/cu132AMD
pip3 install torch torchvision torchaudio --index-url https://download.pytorch.org/whl/rocm7.2或者,您可以安装 PyTorch 的 nightly 版本(ROCm 7.2)。
安装 Nightly 版本
pip3 install --pre torch torchvision torchaudio --index-url https://download.pytorch.org/whl/nightly/rocm7.2Mac ARM Silicon
conda install pytorch-nightly::pytorch torchvision torchaudio -c pytorch-nightly安装 ComfyUI 依赖
cd ComfyUI
pip install -r requirements.txt
启动 ComfyUI
启动 ComfyUI
cd ComfyUI
python main.py
运行 python main.py --help 查看内置帮助,或参阅启动参数参考获取完整命令行选项列表。
如需高级服务器配置(自定义端口、局域网访问、VRAM 模式等),请参阅启动参数参考。
如何更新 ComfyUI
拉取最新代码
使用命令行进入 ComfyUI 的安装路径,然后拉取最新代码。
cd <安装路径>/ComfyUI
git pull
安装依赖
使用命令行进入 ComfyUI 的安装路径,然后安装依赖。
pip install -r requirements.txt添加外部模型路径
如果你想要在 ComfyUI/models 之外管理你的模型文件,可能出于以下原因:
- 你有多个 ComfyUI 实例,你想要让这些实例共享模型文件,从而减少磁盘占用
- 你有多个不同的类型的 GUI 程序,如:WebUI, 你想要他们共用模型文件
- 模型文件无法被识别或读取到
我们提供了通过 extra_model_paths.yaml 配置文件来添加额外模型搜索路径的方法。
不同 ComfyUI 版本配置文件位置
Portable 及自部署
对于便携版和手动安装的 ComfyUI版本,你可以在 ComfyUI 的根目录下找到 extra_model_paths.yaml.example 的示例文件
ComfyUI/extra_model_paths.yaml.example复制并重命名为 extra_model_paths.yaml 来使用, 并保持在 ComfyUI 的根目录下, 路径应该是 ComfyUI/extra_model_paths.yaml
你也可以在 这里 找到配置示例文件
Comfy Desktop
如果你使用的是 ComfyUI 桌面应用程序,你可以参考下图打开额外模型的配置文件:
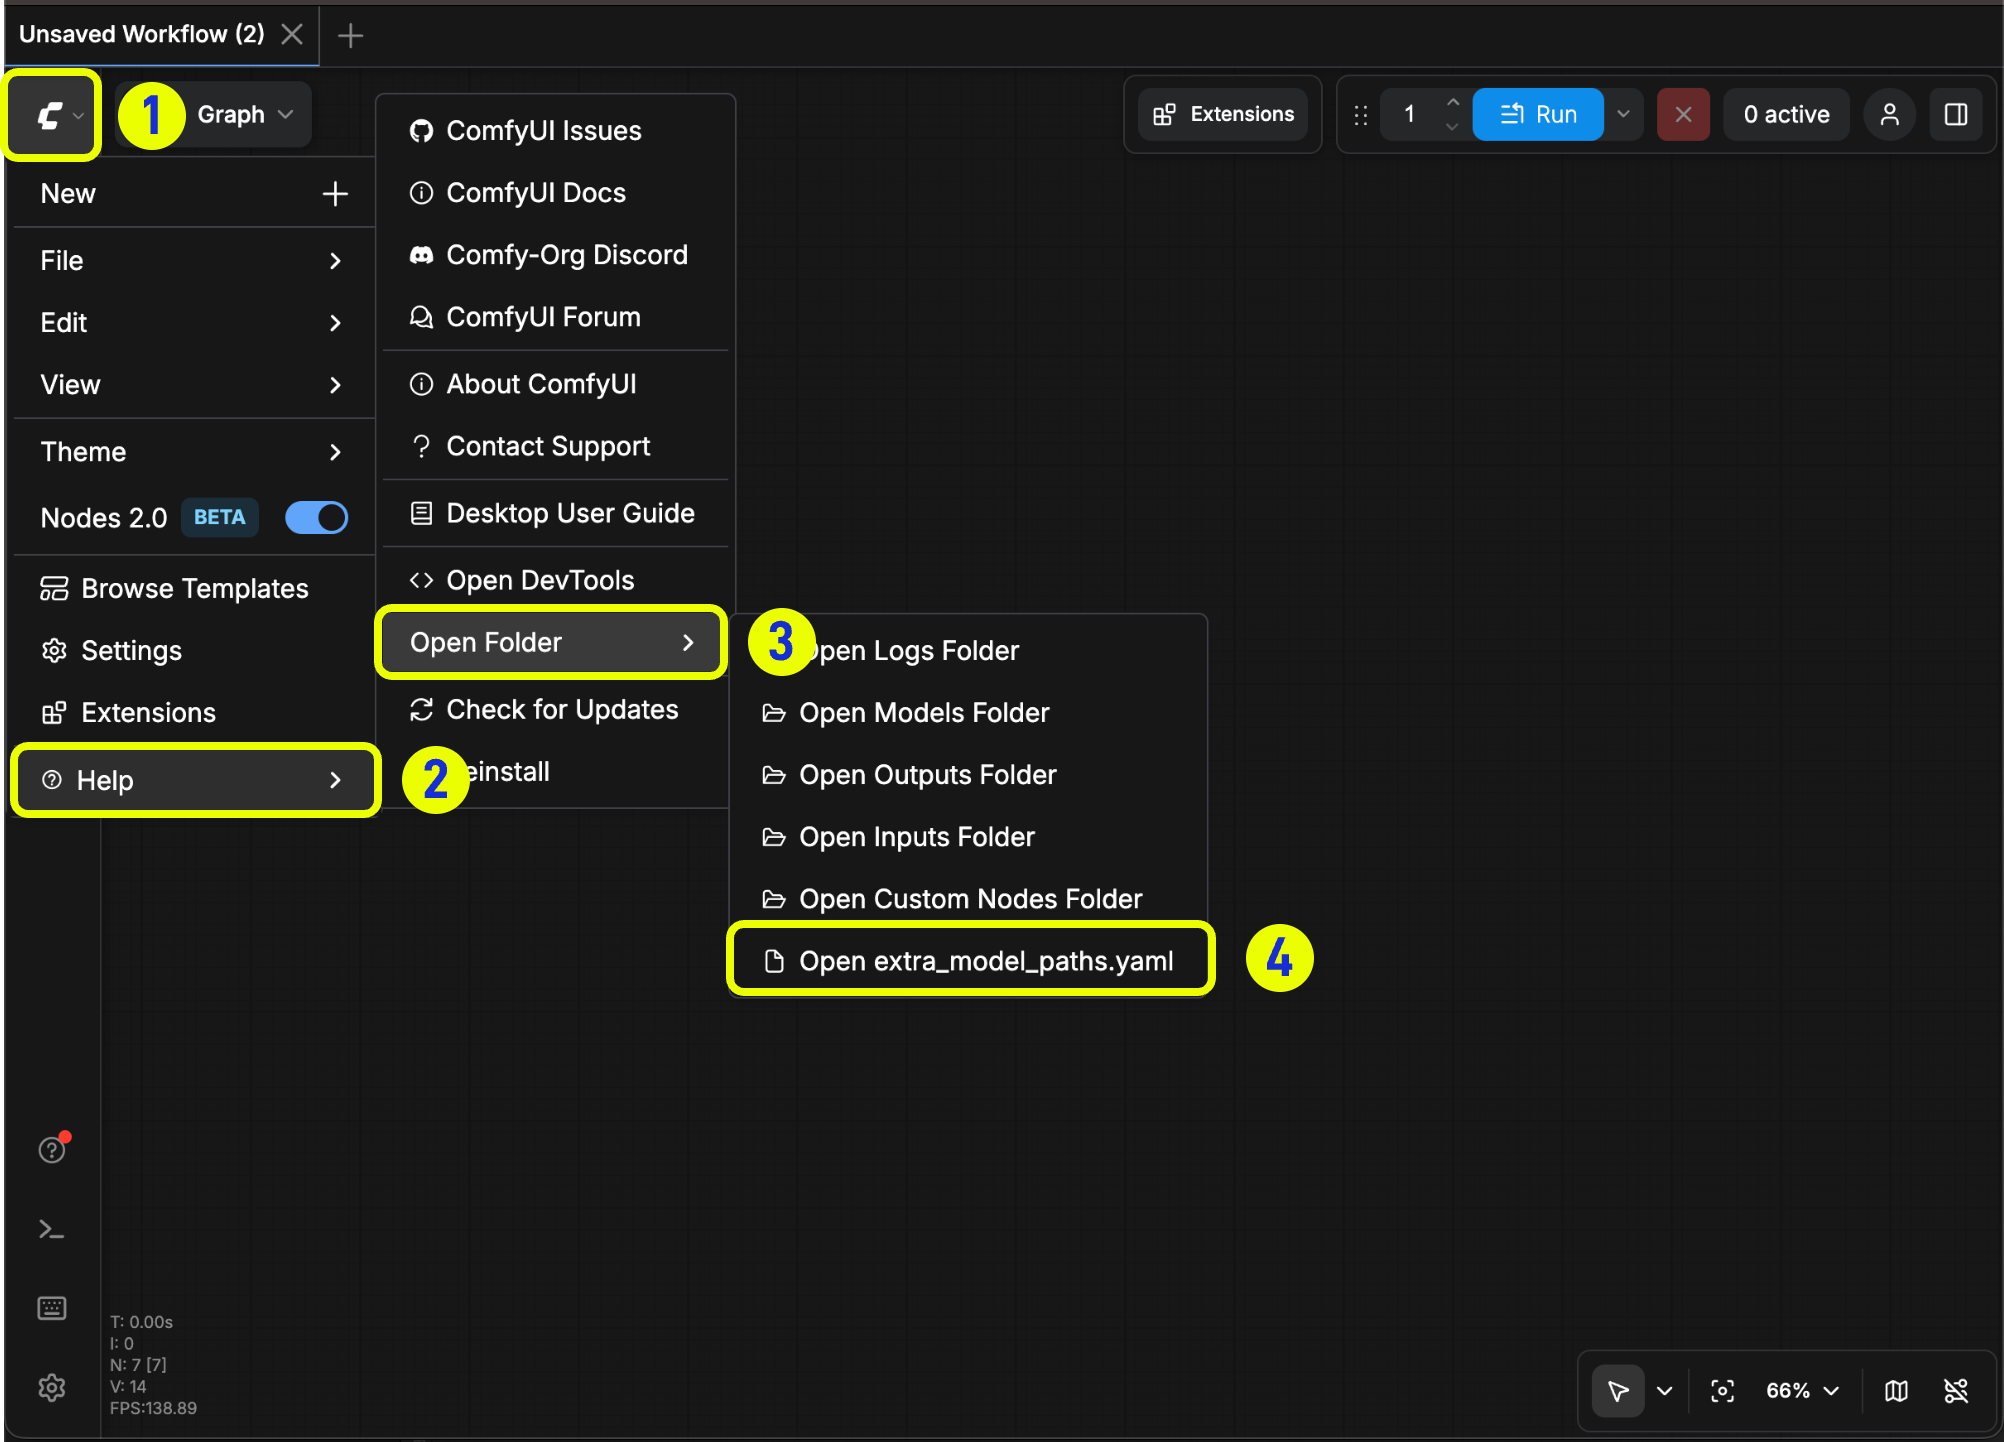
或者通过下面的位置打开:
C:\Users\YourUsername\AppData\Roaming\ComfyUI\extra_models_config.yamlmacOS
~/Library/Application Support/ComfyUI/extra_models_config.yaml对应的配置文件不应该被改变
配置示例
比如,你需要额外让 ComfyUI 识别的模型文件位于下面的文件夹:
📁 YOUR_PATH/
  ├── 📁models/
  |   ├── 📁 loras/
  |   │   └── xxxxx.safetensors
  |   ├── 📁 checkpoints/
  |   │   └── xxxxx.safetensors
  |   ├── 📁 vae/
  |   │   └── xxxxx.safetensors
  |   └── 📁 controlnet/
  |       └── xxxxx.safetensors
那么你可以进行如下的配置来让 ComfyUI 识别到你设备上的模型路径
my_custom_config:
    base_path: YOUR_PATH
    loras: models/loras/
    checkpoints: models/checkpoints/
    vae: models/vae/
    controlnet: models/controlnet/
或者使用
my_custom_config:
    base_path: YOUR_PATH/models/
    loras: loras
    checkpoints: checkpoints
    vae: vae
controlnet: controlnet或者你也可以参考默认的 extra_model_paths.yaml.example 来配置,保存之后, 需要 重启 ComfyUI 才能生效。
下面是完整的原始的配置配置示例:
#Rename this to extra_model_paths.yaml and ComfyUI will load it


#config for a1111 ui
#all you have to do is change the base_path to where yours is installed
a111:
    base_path: path/to/stable-diffusion-webui/

    checkpoints: models/Stable-diffusion
    configs: models/Stable-diffusion
    vae: models/VAE
    loras: |
         models/Lora
         models/LyCORIS
    upscale_models: |
                  models/ESRGAN
                  models/RealESRGAN
                  models/SwinIR
    embeddings: embeddings
    hypernetworks: models/hypernetworks
    controlnet: models/ControlNet

#config for comfyui
#your base path should be either an existing comfy install or a central folder where you store all of your models, loras, etc.

#comfyui:
#     base_path: path/to/comfyui/
#     # You can use is_default to mark that these folders should be listed first, and used as the default dirs for eg downloads
#     #is_default: true
#     checkpoints: models/checkpoints/
#     clip: models/clip/
#     clip_vision: models/clip_vision/
#     configs: models/configs/
#     controlnet: models/controlnet/
#     diffusion_models: |
#                  models/diffusion_models
#                  models/unet
#     embeddings: models/embeddings/
#     loras: models/loras/
#     upscale_models: models/upscale_models/
#     vae: models/vae/

#other_ui:
#    base_path: path/to/ui
#    checkpoints: models/checkpoints
#    gligen: models/gligen
#    custom_nodes: path/custom_nodes
添加额外自定义节点路径
除了添加外部模型之外,你同样可以添加不在 ComfyUI 默认路径下的自定义节点路径
下面是一个简单的配置示例(Mac 系统),请根据你的实际情况进行修改,并新增到对应的配置文件中,保存后需要 重启 ComfyUI 才能生效:
my_custom_nodes:
  custom_nodes: /Users/your_username/Documents/extra_custom_nodes
常见问题
如何停止/退出 ComfyUI
在运行 ComfyUI 的终端窗口中按 Ctrl+C,或直接关闭终端窗口。
官方原文
本页来自 Comfy-Org 官方中文文档的固定版本,并转换为 xueai 静态页面。内容以官方持续更新的页面为准。