管理与治理
Tutorial: Create environments with source control
This tutorial walks through the process of setting up environments end-to-end. You'll create two environments: development and production. It uses GitHub as the Git provider. The process is similar for other providers.
n8n has built its environments feature on top of Git, a version control software. You link an n8n instance to a Git branch, and use a push-pull pattern to move work between environments. You should have some understanding of environments and Git. If you need more information on these topics, refer to:
- Environments in n8n: the purpose of environments, and how they work in n8n.
- Git and n8n: Git concepts and source control in n8n.
Choose your source control pattern
Before setting up source control and environments, you need to plan your environments, and how they relate to Git branches. n8n supports different Branch patterns. For environments, you need to choose between two patterns: multi-instance, multi-branch, or multi-instance, single-branch. This tutorial covers both patterns.
Multiple instances, multiple branches
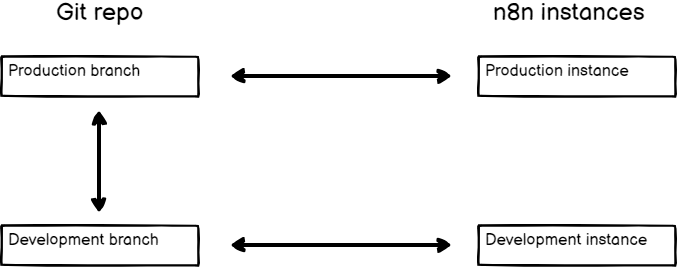
The advantages of this pattern are:
- An added safety layer to prevent changes getting into your production environment by mistake. You have to do a pull request in GitHub to copy work between environments.
- It supports more than two instances.
The disadvantage is more manual steps to copy work between environments.
Multiple instances, one branch
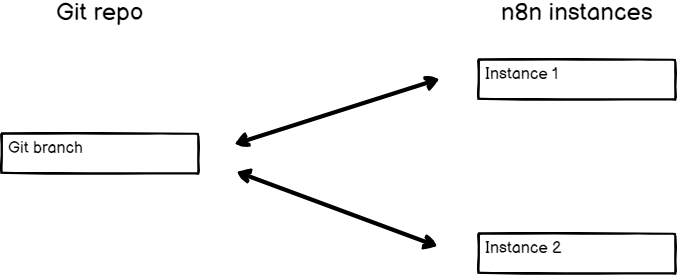
The advantage of this pattern is that work is instantly available to other environments when you push from one instance.
The disadvantages are:
- If you push by mistake, there is a risk the work will make it into your production instance. If you use a GitHub Action to automate pulls to production, you must either use the multi-instance, multi-branch pattern, or be careful to never push work that you don't want in production.
- Pushing and pulling to the same instance can cause data loss as changes are overridden when performing these actions. You should set up processes to ensure content flows in one direction.
Set up your repository
Once you've chosen your pattern, you need to set up your GitHub repository.
Multi-branch
- Make sure the repository is private, unless you want your workflows, tags, and variable and credential stubs exposed to the internet.
- Create the new repository with a README so you can immediately create branches.
- Create one branch named
productionand another nameddevelopment. Refer to Creating and deleting branches within your repository for guidance.
Single-branch
- Make sure the repository is private, unless you want your workflows, tags, and variable and credential stubs exposed to the internet.
- Create the new repository with a README. This creates the
mainbranch, which you'll connect to.
Connect your n8n instances to your repository
Create two n8n instances, one for development, one for production.
Configure Git in n8n
- Go to Settings > Environments.
- Choose your connection method:
- SSH: In Git repository URL, enter the SSH URL for your repository (for example,
git@github.com:username/repo.git). - HTTPS: In Git repository URL enter the HTTPS URL for your repository (for example,
https://github.com/username/repo.git).
- Configure authentication based on your connection method:
- For SSH: n8n supports ED25519 and RSA public key algorithms. ED25519 is the default. Select RSA under SSH Key if your git host requires RSA. Copy the SSH key.
- For HTTPS: Enter your credentials:
- Username: Your Git provider username.
- Token: Your Personal Access Token (PAT) from your Git provider.
Set up a deploy key
Set up SSH access by creating a deploy key for the repository using the SSH key from n8n. The key must have write access. Refer to GitHub | Managing deploy keys for guidance.
Connect n8n and configure your instance
Multi-branch
- In Settings > Environments in n8n, select Connect. n8n connects to your Git repository.
- Under Instance settings, choose which branch you want to use for the current n8n instance. Connect the production branch to the production instance, and the development branch to the development instance.
- Production instance only: select Protected instance to prevent users editing workflows in this instance.
- Select Save settings.
Single-branch
- In Settings > Environments in n8n, select Connect.
- Under Instance settings, select the main branch.
- Production instance only: select Protected instance to prevent users editing workflows in this instance.
- Select Save settings.
Push work from development
In your development instance, create a few workflows, tags, variables, and credentials.
To push work to Git:
- Select Push

in the main menu.
- In the Commit and push changes modal, select which workflows and data tables you want to push. You can filter by status (new, modified, deleted) and search for items. n8n automatically pushes tags, and variable and credential stubs.
n8n pushes the current saved version, not the published version, of the workflow. You need to then separately publish versions on the remote server.
- Enter a commit message. This should be a one sentence description of the changes you're making.
- Select Commit and Push. n8n sends the work to Git, and displays a success message on completion.
Pull work to production
Your work is now in GitHub. If you're using a multi-branch setup, it's on the development branch. If you chose the single-branch setup, it's on main.
Multi-branch
- In GitHub, create a pull request to merge development into production.
- Merge the pull request.
- In your production instance, select Pull

in the main menu.
Single-branch
In your production instance, select Pull
in the main menu.
View screenshot

Pull and push buttons when menu is closed

Pull and push buttons when menu is open
Optional: Use a GitHub Action to automate pulls
If you want to avoid logging in to your production instance to pull, you can use a GitHub Action and the n8n API to automatically pull every time you push new work to your production or main branch.
A GitHub Action example:
name: CI
on:
  # Trigger the workflow on push or pull request events for the "production" branch
  push:
    branches: [ "production" ]
  # Allows you to run this workflow manually from the Actions tab
  workflow_dispatch:
jobs:
  run-pull:
    runs-on: ubuntu-latest
    steps:
      - name: PULL
				# Use GitHub secrets to protect sensitive information
        run: >
          curl --location '${{ secrets.INSTANCE_URL }}/version-control/pull' --header
          'Content-Type: application/json' --header 'X-N8N-API-KEY: ${{ secrets.INSTANCE_API_KEY }}'
Next steps
Learn more about:
官方原文和授权
本页来自 N8N 英文官方网站固定快照,并转换成 xueai 静态页面。内容以 N8N 持续更新的官方页面为准。