节点与集成
HubSpot credentials
You can use these credentials to authenticate the following nodes:
Supported authentication methods
- Service key (recommended): Use with the HubSpot node.
- Developer API key: Use with the HubSpot Trigger node.
- OAuth2: Use with the HubSpot node.
Related resources
Refer to HubSpot's API documentation for more information about the service. The HubSpot Trigger node uses the Webhooks API; refer to HubSpot's Webhooks API documentation for more information about that service.
Using Service Key
To configure this credential, you'll need a HubSpot account with super admin access or Developer tools access permission, and:
- A Service Key
To generate a service key:
- In your HubSpot account, go to Development > Keys > Service Keys. (You can also find Service Keys under Settings > Account Management > Integrations > Service Keys.)
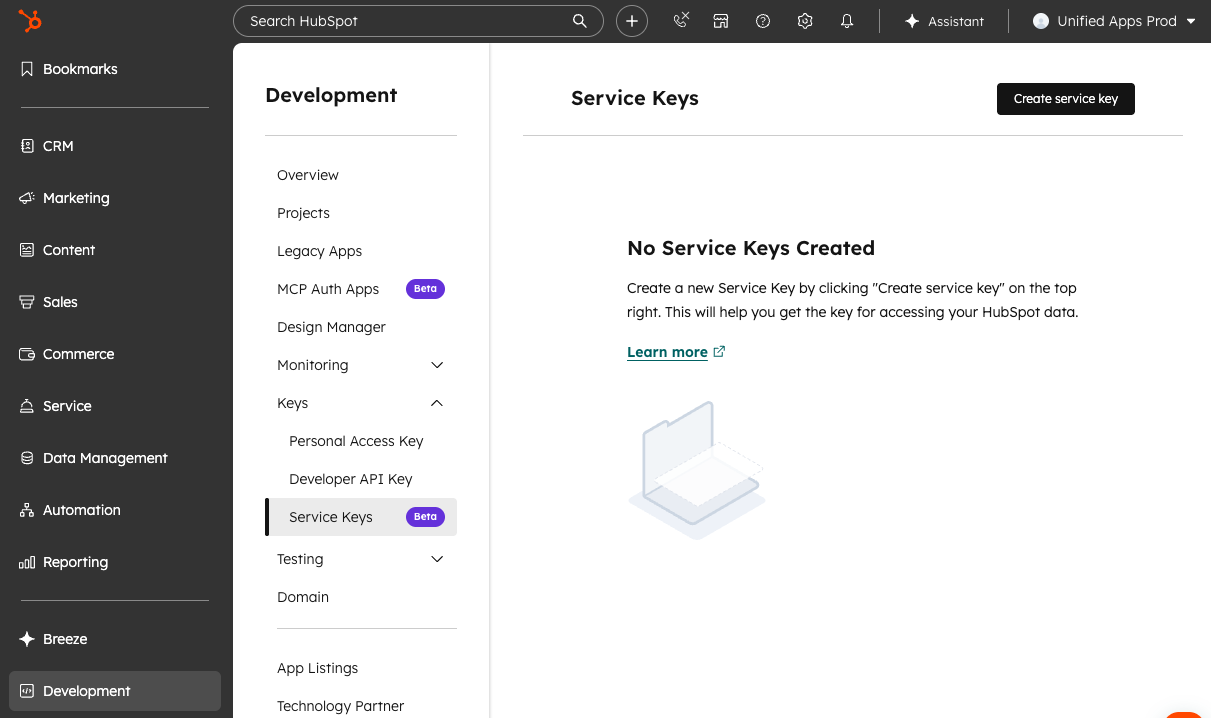
- Select Create service key.
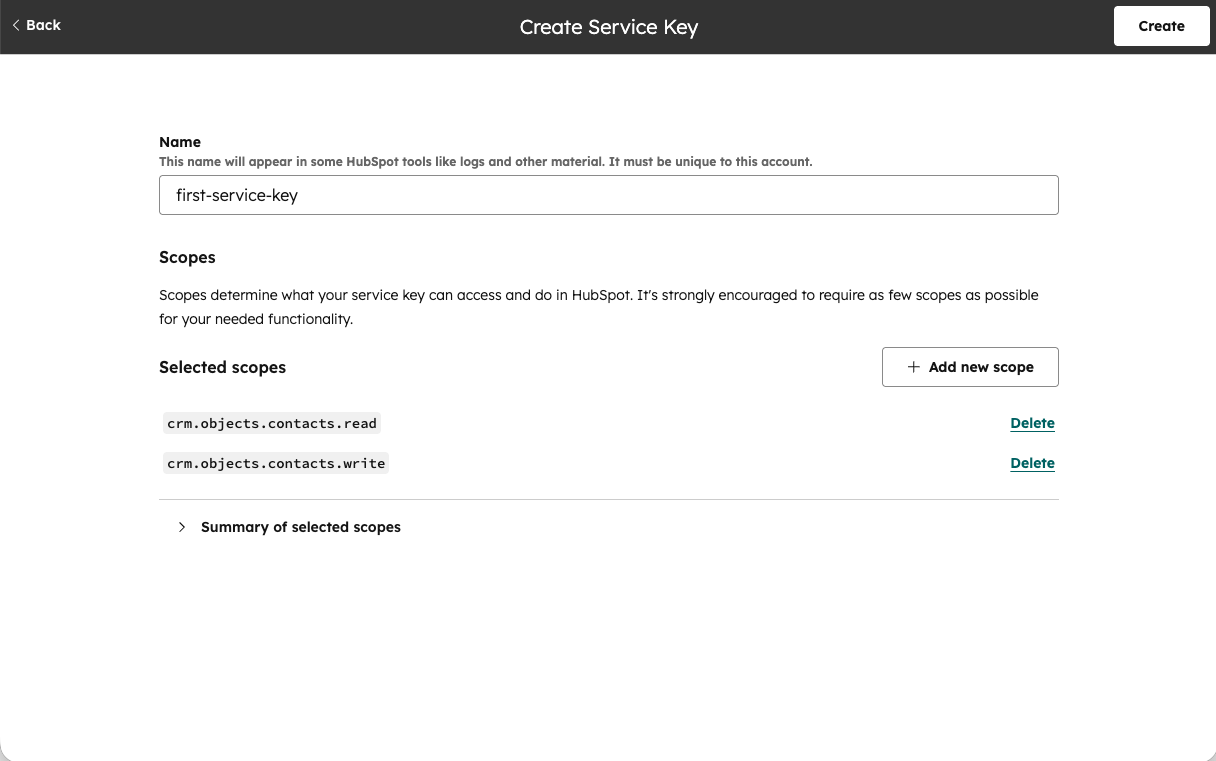
- Enter a descriptive Name for your key.
- Select Add new scope and choose the permissions your integration needs. Refer to Required scopes for HubSpot node for a list of recommended scopes.
- Select Update to confirm your scope selections.
- Select Create, then confirm in the dialog.
- Click on the new service key name to navigate to its details page, and select Show to reveal your key.
- Copy the key value using the copy button, and paste it as the App Token in your n8n credential.
Using Developer API key
To configure this credential, you'll need a HubSpot developer account and:
- A Client ID: Generated once you create a public app.
- A Client Secret: Generated once you create a public app.
- A Developer API Key: Generated from your Developer Apps dashboard.
- An App ID: Generated once you create a public app.
To create the public app and set up the credential:
- Log into your HubSpot app developer account.
- Select Apps from the main navigation bar.
- Select Get HubSpot API key. You may need to select the option to Show key.
- Copy the key and enter it in n8n as the Developer API Key.
- Still on the HubSpot Apps page, select Create app.
- On the App Info tab, add an App name, Description, Logo, and any support contact info you want to provide. Anyone encountering the app would see these.
- Open the Auth tab.
- Copy the App ID and enter it in n8n.
- Copy the Client ID and enter it in n8n.
- Copy the Client Secret and enter it in n8n.
- In the Scopes section, select Add new scope.
- Add all the scopes listed in Required scopes for HubSpot Trigger node to your app.
- Select Update.
- Copy the n8n OAuth Redirect URL and enter it as the Redirect URL in your HubSpot app.
- Select Create app to finish creating the HubSpot app.
Refer to the HubSpot Public Apps documentation for more detailed instructions.
Required scopes for HubSpot Trigger node
If you're creating an app for use with the HubSpot Trigger node, n8n recommends starting with these scopes:
| Element | Object | Permission | Scope name |
|---|---|---|---|
| n/a | n/a | n/a | oauth |
| CRM | Companies | Read | crm.objects.companies.read |
| CRM | Companies schemas | Read | crm.schemas.companies.read |
| CRM | Contacts | Read | crm.objects.contacts.read |
| CRM | Contacts schemas | Read | crm.schemas.contacts.read |
| CRM | Deals | Read | crm.objects.deals.read |
| CRM | Deals schemas | Read | crm.schemas.deals.read |
Using OAuth2
If you're self-hosting n8n, you'll need to configure OAuth2 from scratch by creating a new public app:
- Log into your HubSpot app developer account.
- Select Apps from the main navigation bar.
- Select Create app.
- On the App Info tab, add an App name, Description, Logo, and any support contact info you want to provide. Anyone encountering the app would see these.
- Open the Auth tab.
- Copy the App ID and enter it in n8n.
- Copy the Client ID and enter it in n8n.
- Copy the Client Secret and enter it in n8n.
- In the Scopes section, select Add new scope.
- Add all the scopes listed in Required scopes for HubSpot node to your app.
- Select Update.
- Copy the n8n OAuth Redirect URL and enter it as the Redirect URL in your HubSpot app.
- Select Create app to finish creating the HubSpot app.
Refer to the HubSpot Public Apps documentation for more detailed instructions. If you need more detail on what's happening in the OAuth web flow, refer to the HubSpot Working with OAuth documentation.
Required scopes for HubSpot node
If you're creating an app for use with the HubSpot node, n8n recommends starting with these scopes:
| Element | Object | Permission | Scope name(s) |
|---|---|---|---|
| n/a | n/a | n/a | oauth |
| n/a | n/a | n/a | forms |
| n/a | n/a | n/a | tickets |
| CRM | Companies | Read |
|
| CRM | Companies schemas | Read | crm.schemas.companies.read |
| CRM | Contacts schemas | Read | crm.schemas.contacts.read |
| CRM | Contacts | Read |
|
| CRM | Deals | Read |
|
| CRM | Deals schemas | Read | crm.schemas.deals.read |
| CRM | Owners | Read | crm.objects.owners.read |
| CRM | Lists | Write | crm.lists.write |
官方原文和授权
本页来自 N8N 英文官方网站固定快照,并转换成 xueai 静态页面。内容以 N8N 持续更新的官方页面为准。