部署与运维
Install with Docker
n8n recommends using Docker for most self-hosting needs. It provides a clean, isolated environment, avoids operating system and tooling incompatibilities, and makes database and environment management simpler.
You can also use n8n in Docker with Docker Compose. You can find Docker Compose configurations for various architectures in the n8n-hosting repository.
You can also follow along with our video guide here:
Prerequisites
Before proceeding, install Docker:
- Docker Desktop is available for Mac, Windows, and Linux. Docker Desktop includes the Docker Engine and Docker Compose.
- Docker Engine and Docker Compose are also available as separate packages for Linux. Use this for Linux machines without a graphical environment or when you don't want the Docker Desktop UI.
Starting n8n
From your terminal, run the following commands, replacing the <YOUR_TIMEZONE> placeholders with your timezone:
docker volume create n8n_data

docker run -it --rm \
 --name n8n \
 -p 5678:5678 \
 -e GENERIC_TIMEZONE="<YOUR_TIMEZONE>" \
 -e TZ="<YOUR_TIMEZONE>" \
 -e N8N_ENFORCE_SETTINGS_FILE_PERMISSIONS=true \
 -e N8N_RUNNERS_ENABLED=true \
 -v n8n_data:/home/node/.n8n \
 docker.n8n.io/n8nio/n8n
This command creates a volume to store persistent data, downloads the required n8n image, and starts the container with the following settings:
- Maps and exposes port
5678on the host. - Sets the timezone for the container:
- the
TZenvironment variable sets the system timezone to control what scripts and commands likedatereturn. - the
GENERIC_TIMEZONEenvironment variable sets the correct timezone for schedule-oriented nodes like the Schedule Trigger node. - Enforces secure file permissions for the n8n configuration file.
- Enables task runners, the recommended way of executing tasks in n8n.
- Mounts the
n8n_datavolume to the/home/node/.n8ndirectory to persist your data across container restarts.
Once running, you can access n8n by opening: <http://localhost:5678>
Using with PostgreSQL
By default, n8n uses SQLite to save credentials1, past executions, and workflows. n8n also supports PostgreSQL, configurable using environment variables as detailed below.
To use n8n with PostgreSQL, execute the following commands, replacing the placeholders (depicted within angled brackets, for example <POSTGRES_USER>) with your actual values:
docker volume create n8n_data

docker run -it --rm \
 --name n8n \
 -p 5678:5678 \
 -e GENERIC_TIMEZONE="<YOUR_TIMEZONE>" \
 -e TZ="<YOUR_TIMEZONE>" \
 -e N8N_ENFORCE_SETTINGS_FILE_PERMISSIONS=true \
 -e N8N_RUNNERS_ENABLED=true \
 -e DB_TYPE=postgresdb \
 -e DB_POSTGRESDB_DATABASE=<POSTGRES_DATABASE> \
 -e DB_POSTGRESDB_HOST=<POSTGRES_HOST> \
 -e DB_POSTGRESDB_PORT=<POSTGRES_PORT> \
 -e DB_POSTGRESDB_USER=<POSTGRES_USER> \
 -e DB_POSTGRESDB_SCHEMA=<POSTGRES_SCHEMA> \
 -e DB_POSTGRESDB_PASSWORD=<POSTGRES_PASSWORD> \
 -v n8n_data:/home/node/.n8n \
 docker.n8n.io/n8nio/n8n
You can find a complete docker-compose file for PostgreSQL in the n8n hosting repository.
Updating
To update n8n, in Docker Desktop, navigate to the Images tab and select Pull from the context menu to download the latest n8n image:
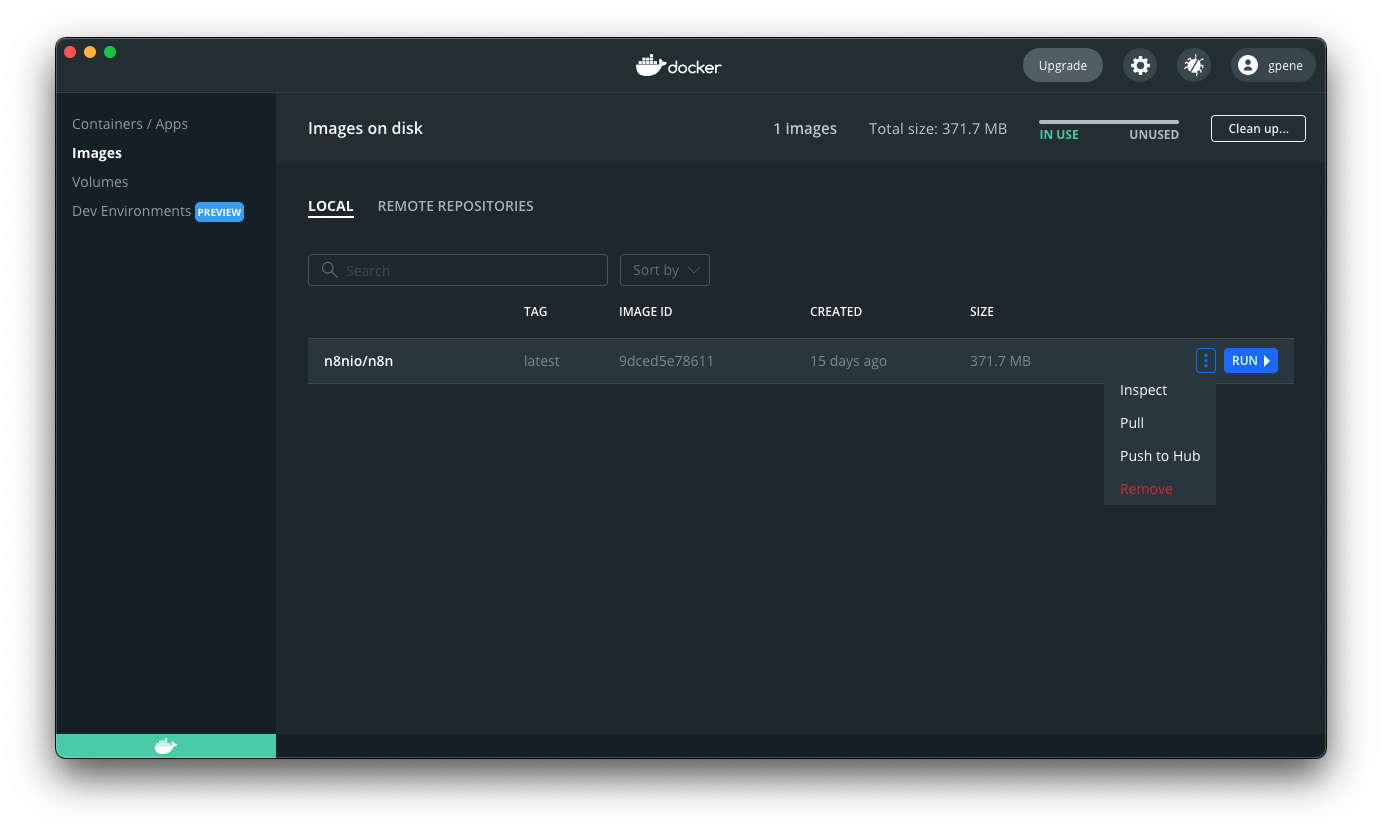
You can also use the command line to pull the latest, or a specific version:
# Pull latest (stable) version
docker pull docker.n8n.io/n8nio/n8n

# Pull specific version
docker pull docker.n8n.io/n8nio/n8n:1.81.0

# Pull next (unstable) version
docker pull docker.n8n.io/n8nio/n8n:next
After pulling the updated image, stop your n8n container and start it again. You can also use the command line. Replace <container_id> in the commands below with the container ID you find in the first command:
# Find your container ID
docker ps -a

# Stop the container with the `<container_id>`
docker stop <container_id>

# Remove the container with the `<container_id>`
docker rm <container_id>

# Start the container
docker run --name=<container_name> [options] -d docker.n8n.io/n8nio/n8n
Updating Docker Compose
If you run n8n using a Docker Compose file, follow these steps to update n8n:
# Navigate to the directory containing your docker compose file
cd </path/to/your/compose/file/directory>

# Pull latest version
docker compose pull

# Stop and remove older version
docker compose down

# Start the container
docker compose up -d
n8n with tunnel 
To use webhooks for trigger nodes of external services like GitHub, n8n has to be reachable from the web. n8n provides a tunnel service using cloudflared that redirects requests from the web to your local n8n instance. Docker must be installed for the tunnel to work.
There are two ways to use the tunnel, depending on how you run n8n:
Full stack
This runs n8n and cloudflared together in containers. The tunnel URL prints on startup and everything is wired automatically:
pnpm stack --tunnelServices only
If you prefer to run n8n locally with pnpm dev or pnpm start, you can start cloudflared as a standalone service:
# Terminal 1: Start the cloudflared tunnel service
pnpm --filter n8n-containers services --services cloudflared

# Terminal 2: Start n8n locally
pnpm dev
The services command:
- Starts cloudflared pointing at
host.docker.internal:5678(your local n8n). - Fetches the public tunnel URL from cloudflared's metrics endpoint.
- Writes a
.envfile topackages/cli/bin/.envwithWEBHOOK_URLandN8N_PROXY_HOPS=1. pnpm devandpnpm startpick up that.envautomatically via dotenv.
Clean up when done:
pnpm --filter n8n-containers services:cleanNext steps
- Find more information about Docker setup in the README file for the Docker image.
- Learn more about configuring and scaling n8n.
- Or explore using n8n: try the Quickstarts.
Footnotes
- Back
In n8n, credentials store authentication information to connect with specific apps and services. After creating credentials with your authentication information (username and password, API key, OAuth secrets, etc.), you can use the associated app node to interact with the service.
官方原文和授权
本页来自 N8N 英文官方网站固定快照,并转换成 xueai 静态页面。内容以 N8N 持续更新的官方页面为准。