API、CLI 与扩展
Connect to n8n MCP server
Connect supported MCP clients to your n8n workflows through n8n's built-in MCP server.
The server allows clients such as Lovable or Claude Desktop to connect securely to an n8n instance. Once connected, these clients can:
- Search for your workflows
- Interact with workflows marked as available in MCP
- Trigger and test exposed workflows
- Create and edit workflows and data tables
Difference between instance-level MCP access and MCP Server Trigger node
Instance-level MCP access lets you create one connection per n8n instance, use centralized authentication, and choose which workflows to enable for access. Enabled workflows are easy to find and run without extra setup for each workflow.
In comparison, you configure an MCP Server Trigger node inside a single workflow. This node exposes tools only from that workflow, a useful approach when you want to craft a specific MCP server behavior within one workflow.
Key considerations when using instance-level MCP access
- MCP supports two types of workflow interactions: running existing workflows with the workflow execution tools, and building or editing workflows (v2.13 onward).
- It doesn’t provide blanket exposure to all workflows in your instance. You must enable MCP at the instance level and then enable each workflow individually. The only exception here is the
search_workflowstool, which is able to access all workflows current user has access to but it will only be able to surface previews, not the full workflow data. - It's not scoped to each MCP client. All clients you connect (for example, Claude Desktop and ChatGPT) can see all workflows you've enabled for MCP access. You can't restrict specific workflows to specific clients. On a user level, visibility remains user-scoped: users can only see MCP-enabled workflows they have access to.
- Most MCP tools work on unpublished workflows. The exception is
execute_workflow, which defaults to production mode and runs the published version of a workflow. It also supports amanualexecution mode to run the current (unpublished) version.
Enabling MCP access
For Cloud and self-hosted instances
- Navigate to Settings > Instance-level MCP
- Toggle Enable MCP access (requires instance owner or admin permissions).
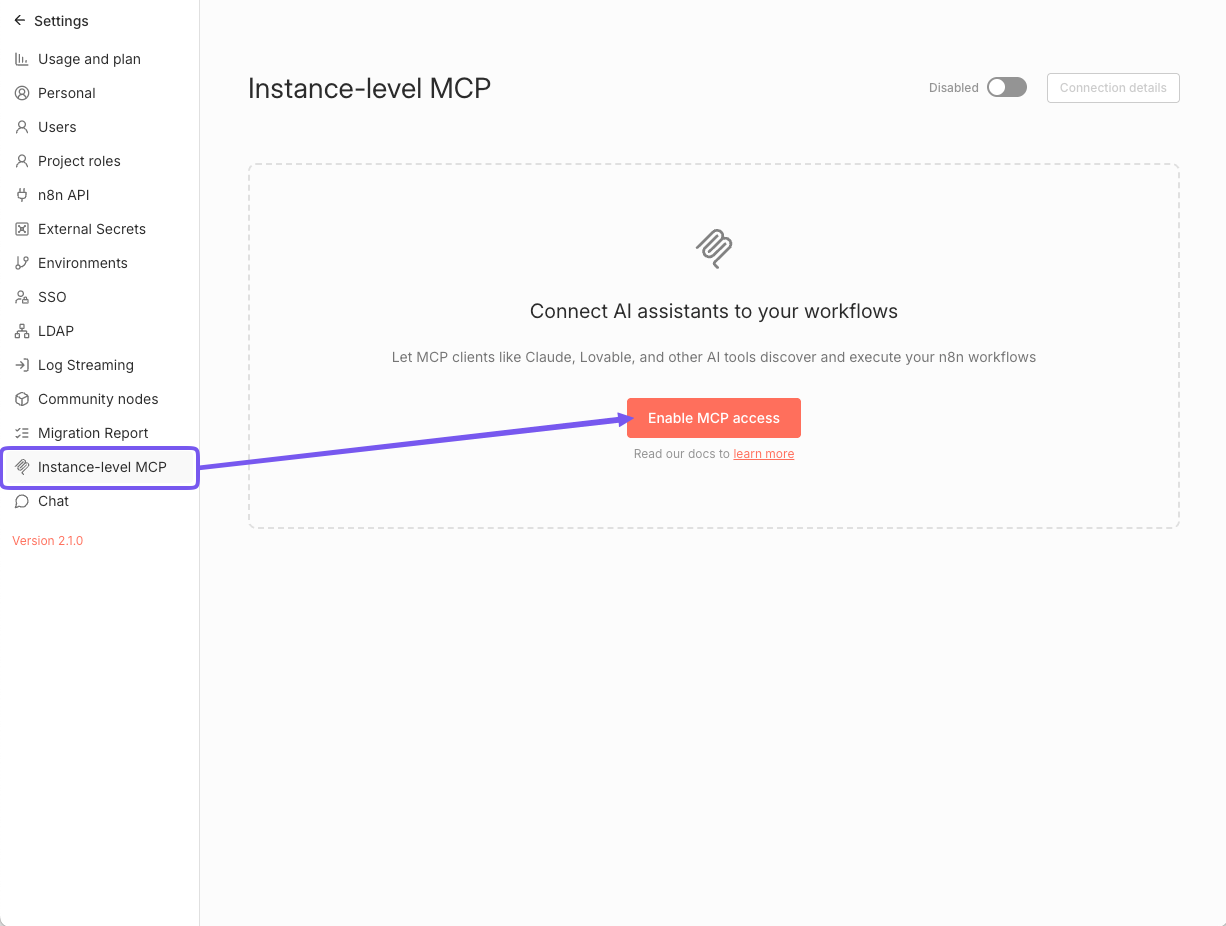
Once enabled, you'll see:
- List of workflows exposed to MCP clients
- List of connected OAuth clients
- Main MCP toggle to enable/disable instance-level access
- Connection details button that shows detailed instructions for connecting MCP clients
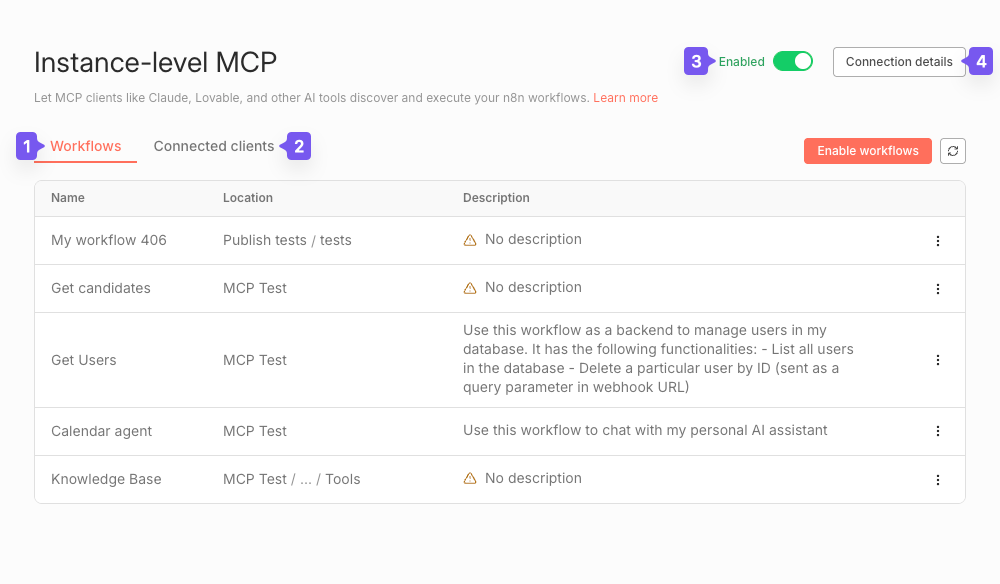
To disable: Toggle the main MCP toggle off.
For self-hosted: Complete disablement
To remove the feature entirely, set the environment variable:
N8N_DISABLED_MODULES=mcp
This action removes MCP endpoints and hides all related UI elements.
Setting up MCP authentication
The Connection details popup menu provides two authentication options for MCP clients:
- OAuth2
- Access Token
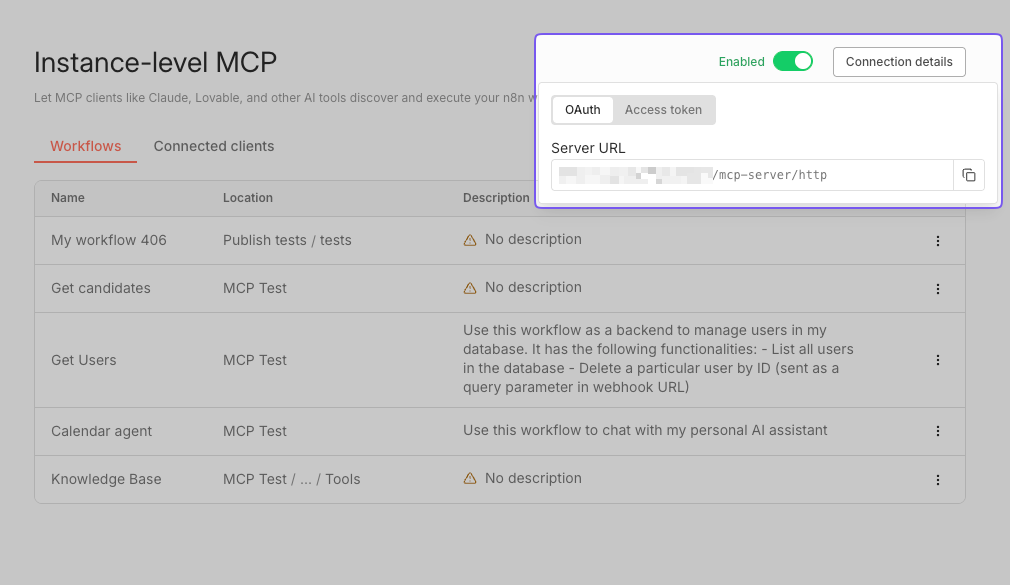
Using OAuth2
Copy your instance server URL from the OAuth tab and use it to configure your MCP client. After connecting, the client will redirect you to n8n to authorize access.
Revoking client access
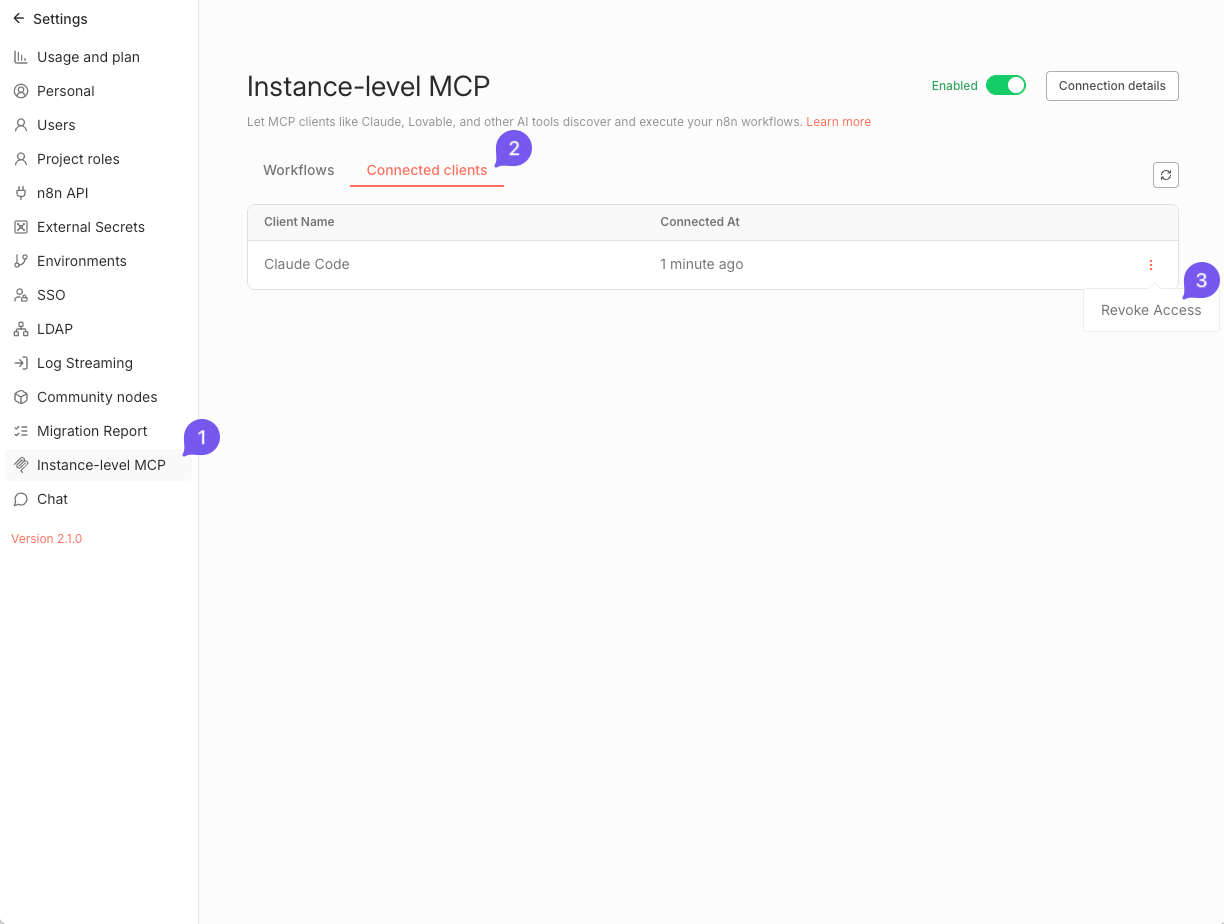
To revoke access for connected MCP clients:
- Navigate to Settings > Instance-level MCP.
- Switch to the Connected clients tab. You should see a table of connected OAuth clients.
- Use the action menu in each client's row to revoke access for specific clients.
Using Access Token
Use your instance server URL and your personal MCP Access Token from the Access Token tab on the Connection details menu.
When you first visit the MCP Access page, n8n automatically generates a personal MCP Access Token tied to your user account.
Rotating your token
If you lose your token or need to rotate it:
- Navigate to Settings > Instance-level MCP.
- Open the Connection details menu by clicking the button in the top-right corner.
- Switch to the Access Token tab.
- Generate a new token using the button next to the redacted token value.
n8n revokes the previous token when you generate a new one.
- Update all connected MCP clients with the new value.
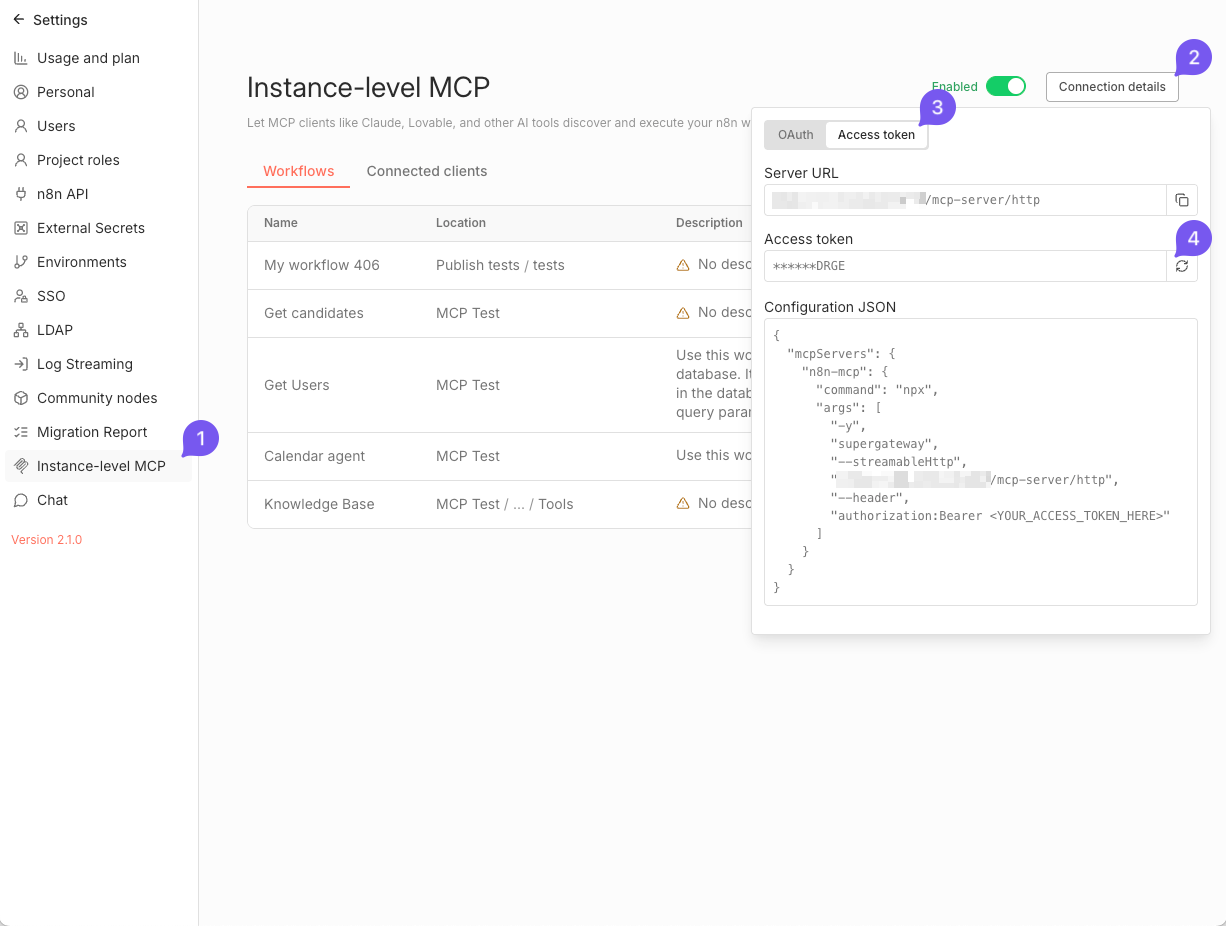
Exposing workflows to MCP clients
MCP clients can discover previews of all workflows the current user has access to using search_workflows. However, clients can't access full workflow data, nor execute or modify a workflow unless you explicitly enable MCP access for that workflow.
Enabling access for individual workflows
Option 1: From MCP settings page (available from n8n v2.2.0)
- Click the Enable workflows button (in the workflows table header or in the table's empty state)
- Search for the desired workflow (by name or description) and select it from the list
- Click Enable button to confirm
Option 2: From the workflow editor
- Open the workflow.
- Click the main workflow menu (
...) in the top-right corner. - Select Settings.
- Toggle Available in MCP.
Option 3: From the workflows list
- Go to Workflows.
- Open the menu on a workflow card.
- Select Enable MCP access.
Enabling access for projects/folders
You can use the Options menu

in the workflow list to toggle MCP access for all workflows in the current project or folder:
- Navigate to the desired project and select Workflows from the top menu, then open a subfolder if required.
- Select the Options menu
next to the name of the project or folder.
- Select Manage MCP access, then either Enable MCP or Disable MCP.
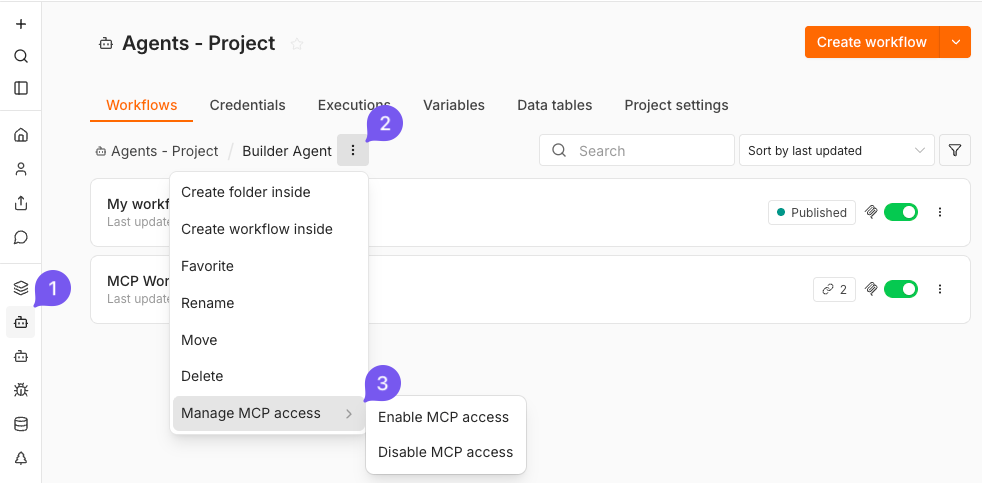
Managing access
The Instance-level MCP settings page shows all workflows enabled for MCP clients to access and operate on. From this list you can:
- Open a workflow, its home project or parent folder directly
- Revoke access using the action menu (or use Disable MCP access from the workflow card menu)
- Update workflow description using the action menu (or use the menu in the workflow editor)
- Enable access for more workflows using the Enable workflows button (available from n8n v2.2.0)
Workflow descriptions
To help MCP clients identify workflows, you can add free-text descriptions as follows:
- Option 1: From the Instance-level MCP page
- Navigate to Settings > Instance-level MCP.
- Make sure you are on the Workflows tab.
- Use the action menu in the desired workflow's row and select the Edit description action.
- Alternatively, click the description text directly to open the edit dialog.
- Option 2: From the workflow editor
- Open the workflow.
- Click the main workflow menu (
...) in the top-right corner. - Select Edit description.
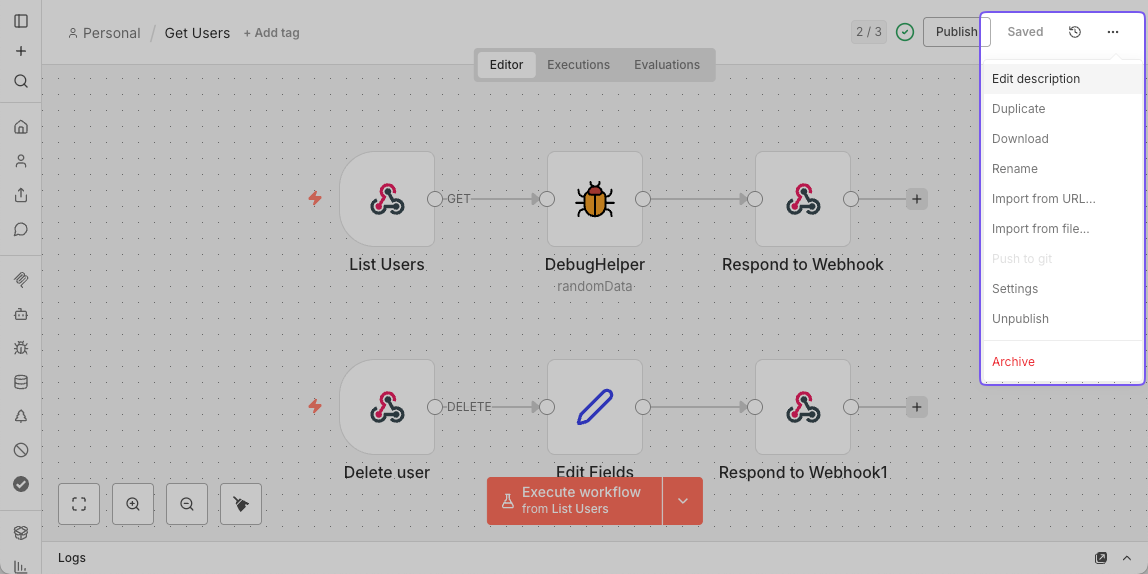
Tools and resources
The n8n MCP server exposes tools for workflow management, workflow building, and data tables. For a complete list of available tools and their parameters, refer to the MCP server tools reference.
n8n Skills for coding agents
When you connect a coding agent to the n8n MCP server, the agent can build and edit workflows, but it doesn't automatically know n8n's conventions for expressions, node configuration, error handling, and other patterns. n8n Skills give the agent that knowledge so it gets workflows right the first time.
n8n Skills are a set of capability modules published in the n8n-io/skills repository. They pair with the instance-level MCP server and include:
- 13 capability skills covering workflow best practices, including subworkflows, expressions, loops, AI agents, error handling, credentials, Data Tables, and debugging.
- 50+ reference documents and examples with per-node guidance, decision trees, and copy-paste workflow snippets.
- Hooks that load the right guidance automatically, so the agent reads the relevant skill before it makes high-impact MCP calls.
A 14th meta-skill, using-n8n-skills-official, routes the agent to the matching capability skill for each task.
Why use skills
Skills load guidance at the moment the agent needs it, rather than relying on the model's general knowledge. This helps the agent:
- Follow n8n best practices for the node or feature it's working with.
- Avoid common mistakes, such as incorrect expression syntax or missing error handling.
- Produce workflows that need less back-and-forth to fix.
The skills are plain Markdown, so you can read, fork, and modify them for your own conventions.
Installing skills
The n8n-io/skills repository has up-to-date install instructions for Claude Code, Codex, and other coding agents. Follow the steps in the repository README to add the skills to your agent.
Examples
Connecting Lovable to n8n MCP server
- Configure MCP Server in Lovable (OAuth).
- Navigate to your workspace Settings > Integrations.
- In the MCP Servers section, find n8n and click Connect.
- Enter your n8n server URL (shown on the MCP Access page).
- Save the connection. If successful, n8n redirects you to authorize Lovable.
- Verify connectivity.
- Once connected, Lovable can query for workflows with MCP access enabled.
- Example: Asking Lovable to build a workflow UI that lists users and allows deleting them.
Connecting Claude Desktop to n8n MCP server
Using OAuth2
- Navigate to Settings > Connectors in Claude Desktop.
- Click on Add custom connector.
- Enter the following details:
- Name: n8n MCP
- Remote MCP Server URL: Your n8n base URL (shown on the Instance-level MCP page)
- Save the connector.
- When prompted, authorize Claude Desktop to access your n8n instance.
Using Access Token
Add the following entry to your claude_desktop_config.json file:
"mcpServers": {
  "n8n-mcp": {
    "command": "npx",
    "args": [
    "-y",
    "supergateway",
    "--streamableHttp",
    "https://<your-n8n-domain>/mcp-server/http",
    "--header",
    "Authorization:Bearer <YOUR_N8N_MCP_TOKEN>"
    ]
  }
}
Here, replace:
<your-n8n-domain>: Your n8n base URL (shown on the Instance-level MCP page)
Connecting Claude Code to n8n MCP server
OPTION 1: Authenticate using OAuth2 (Recommended)
Use the following CLI command:
claude mcp add --transport http n8n-mcp https://<your-n8n-domain>/mcp-server/httpAlternatively, add the following entry to your claude.json file:
{
    "mcpServers": {
        "n8n-mcp": {
            "type": "http",
            "url": "https://<your-n8n-domain>/mcp-server/http"
        }
    }
}
Here, replace:
<your-n8n-domain>: Your n8n base URL (shown on the Instance-level MCP page)
OPTION 2: Authenticate using Access Token
Use the following CLI command:
claude mcp add --transport http n8n-mcp https://<your-n8n-domain>/mcp-server/http \
  --header "Authorization: Bearer <YOUR_N8N_MCP_TOKEN>"
Alternatively, add the following entry to your claude.json file:
{
    "mcpServers": {
        "n8n-mcp": {
            "type": "http",
            "url": "https://<your-n8n-domain>/mcp-server/http",
            "headers": {
                "Authorization": "Bearer <YOUR_N8N_MCP_TOKEN>"
            }
        }
    }
}
Here, replace:
<your-n8n-domain>: Your n8n base URL (shown on the Instance-level MCP page)<YOUR_N8N_MCP_TOKEN>: Your generated token
Connecting Codex CLI to n8n MCP server
OPTION 1: Authenticate using OAuth2 (Recommended)
Use the following CLI command:
codex mcp add n8n-mcp --url https://<your-n8n-domain>/mcp-server/httpAlternatively, add the following entry to your ~/.codex/config.toml file:
[mcp_servers.n8n-mcp]
url = "http://localhost:5678/mcp-server/http"
Here, replace:
<your-n8n-domain>: Your n8n base URL (shown on the Instance-level MCP page)
OPTION 2: Authenticate using Access Token
Add the following entry to your ~/.codex/config.toml file:
[mcp_servers.n8n-mcp]
url = "https://<your-n8n-domain>/mcp-server/http"
http_headers = { "authorization" = "Bearer <YOUR_N8N_MCP_TOKEN>" }
Here, replace:
<your-n8n-domain>: Your n8n base URL (shown on the Instance-level MCP page)<YOUR_N8N_MCP_TOKEN>: Your generated token
Connecting Google ADK agent to n8n MCP server
Here's sample code to create an agent that connects to a remote n8n MCP server:
from google.adk.agents import Agent
from google.adk.tools.mcp_tool import McpToolset
from google.adk.tools.mcp_tool.mcp_session_manager import StreamableHTTPServerParams

N8N_INSTANCE_URL = "https://localhost:5678"
N8N_MCP_TOKEN = "YOUR_N8N_MCP_TOKEN"

root_agent = Agent(
    model="gemini-2.5-pro",
    name="n8n_agent",
    instruction="Help users manage and execute workflows in n8n",
    tools=[
        McpToolset(
            connection_params=StreamableHTTPServerParams(
                url=f"{N8N_INSTANCE_URL}/mcp-server/http",
                headers={
                    "Authorization": f"Bearer {N8N_MCP_TOKEN}",
                },
            ),
        )
    ],
)
For more details, see Connect ADK agent to n8n.
Troubleshooting
If you encounter issues connecting MCP clients to your n8n instance, consider the following:
- Ensure that your n8n instance is publicly accessible if you are using cloud-based MCP clients.
- Verify that the MCP access is enabled in n8n settings.
- Check that the workflows you want to execute or modify are marked as Available in MCP.
- Confirm that the authentication method (OAuth2 or Access Token) is correctly configured in your MCP client.
- Review n8n server logs for any error messages related to MCP connections.
官方原文和授权
本页来自 N8N 英文官方网站固定快照,并转换成 xueai 静态页面。内容以 N8N 持续更新的官方页面为准。